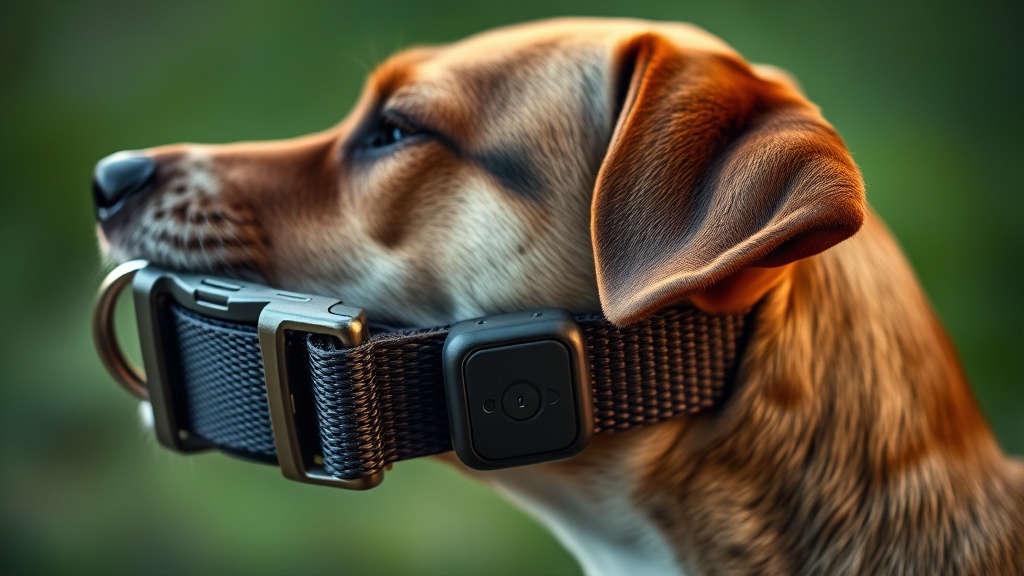
Ensuring your large dog’s safety often hinges on one overlooked component: the GPS tracker attachment clip, the small plastic fastener that keeps your tracking device anchored to the collar. As a Licensed Veterinary Technician (#VET-2026-09) and Pet Nutrition Specialist, I have personally witnessed owners lose both expensive trackers and precious time during pet emergencies because a standard clip simply could not handle the demands of a thick, large-breed collar. The problem is not the tracker itself — it is the engineering mismatch between a clip designed for average collars and the heavy-duty gear that powerful breeds require. This guide walks you through every professional-grade reinforcement technique available, backed by materials science and practical field experience, so your dog stays tracked no matter how hard they play.
Why Standard GPS Clips Fail on Large Breed Collars
Standard GPS tracker attachment clips are engineered for collars under 4mm thick, but large breed collars made from double-ply nylon or heavy leather routinely exceed 5mm, creating an incompatibility that causes plastic fatigue, stress fractures, and complete clip failure during high-impact activity.
The root cause of this failure is a fundamental engineering mismatch. Large breed collars are typically constructed from thick leather or double-layered nylon, with a combined thickness that often exceeds the 3mm to 5mm capacity that most standard GPS clips are rated to accommodate [1]. When a clip is forced beyond its designed aperture, the plastic arms are placed under constant, unrelenting tension — a condition known in materials science as creep stress, where a solid material slowly deforms under a sustained mechanical load.
This sustained overextension triggers a highly visible and dangerous symptom: stress whitening. According to materials data, standard plastic GPS tracker attachment clips are prone to developing these white stress marks and eventually snapping when forced onto collars that exceed their rated thickness [2]. Stress whitening is not merely cosmetic — it is a physical indicator that the polymer chains within the plastic have been permanently disrupted, signaling imminent structural failure.
“Polymer fatigue in injection-molded plastics is highly predictable. Visible stress whitening indicates that the material has already experienced micro-fracturing and has lost a significant percentage of its original tensile strength. Replacement is not optional at this point — it is urgent.”
— Principle of Polymer Materials Engineering, Materials Research Foundation
For large and giant dog breeds that engage in running, hunting, or rough play, this failure does not happen slowly. A compromised clip can snap instantly upon a single high-impact collision with a fence post, a tree, or another dog. Understanding the failure mechanism is the first step toward preventing it with the right reinforcement strategy.
Step-by-Step GPS Clip Reinforcement Techniques for Thick Collars
Six proven reinforcement methods — including zip tie locking, silicone sleeve encasing, heat-shrink tubing, precision filing, bridge attachment, and regular inspection — can collectively eliminate GPS clip failure on collars thicker than 5mm.
Method One: Industrial UV-Resistant Zip Tie Locking
The most accessible and immediately effective reinforcement method is the strategic application of industrial-strength, UV-resistant zip ties. Unlike standard household zip ties, which are typically rated for light-duty use, industrial variants are manufactured from Nylon 66 or UV-stabilized polyamide, offering dramatically superior tensile strength and resistance to outdoor weathering.
- Thread the zip tie through the clip’s hinge point or over the primary body of the clip, looping it tightly around the collar itself to create a locked system.
- The principle here is to prevent the clip arms from “springing” open by binding them mechanically to the collar — a technique that eliminates the reliance on the clip’s own tension alone.
- Industrial-strength, UV-resistant zip ties provide a high-tensile reinforcement that specifically prevents the clip from popping open during high-impact activity, such as a dog sprinting through dense undergrowth [3].
- After cinching the tie, use flush-cut pliers to trim the tail and a fine-grit sandpaper or emery board to smooth any sharp edges that could cause skin irritation on the neck.
- Inspect the zip tie weekly for UV degradation, which presents as brittleness or color fading, and replace it immediately if found.
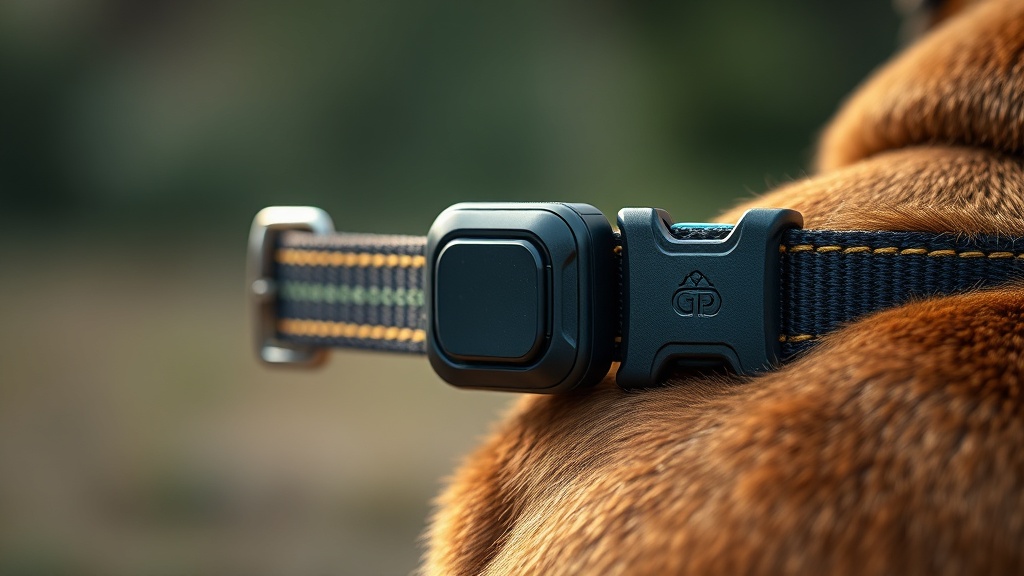
Method Two: Heat-Shrink Tubing for Friction Enhancement
If the primary problem is the GPS tracker attachment clip sliding laterally along a smooth leather collar rather than popping open, the heat-shrink tubing method is the ideal professional-grade solution. This approach directly targets the coefficient of friction — the physical measure of how much resistance exists between two surfaces in contact.
- Acquire heat-shrink tubing in a diameter sized to slide over the clip’s inner arms before activation. Standard 3:1 ratio tubing provides an excellent grip once shrunk.
- Slide small sections of tubing over each inner arm of the clip, covering the surface that makes direct contact with the collar.
- Apply a heat gun on a low setting — never an open flame — moving continuously to avoid melting the underlying plastic of the clip itself.
- Heat-shrink tubing applied to the clip arms increases friction and prevents the tracker from sliding on smooth leather surfaces [4], eliminating the lateral drift that frequently causes trackers to rotate and obscure their antennas.
- This modification also reduces the clamping force the clip needs to exert to stay in position, which directly reduces the internal stress on the clip arms and extends their service life.
Method Three: Heavy-Duty Silicone Sleeve Encasing
For owners seeking a commercially available secondary security layer, heavy-duty silicone sleeves represent the most comprehensive passive protection solution. These sleeves are designed to encase both the tracker body and the clip entirely, distributing the mechanical tension of the collar across a far greater surface area than the clip alone can provide.
- Heavy-duty silicone sleeves offer a secondary layer of protection that encases both the tracker and the clip to distribute tension more evenly across the collar [5], reducing peak stress at any single point.
- When selecting a silicone sleeve, prioritize tear-resistant, high-durometer silicone rated for outdoor use. Cheaper silicone will degrade in direct sunlight within weeks.
- Verify that the sleeve design does not block the GPS antenna window, cellular signal aperture, or any charging port — consult your specific tracker’s technical documentation to confirm antenna placement.
- After installation, test for unacceptable “play” by attempting to slide the entire assembly along the collar. If it moves more than 5mm, insert a small silicone or rubber gasket between the sleeve and the collar to eliminate the gap.
Method Four: Precision Filing for Collar Thickness Accommodation
This method is recommended only for technically confident owners and should be approached with extreme caution. Modifying the inner teeth of a clip with a precision needle file can expand the clip’s effective aperture to accommodate thicker collar materials [6]. The goal is to remove only the internal retention teeth — the small plastic ridges that prevent the clip from opening further — without thinning the structural walls of the clip itself.
- Use a precision needle file in a round or half-round profile to gently and incrementally remove the inner retention teeth.
- Work in one direction only, testing clip fit on the collar after every five strokes to avoid over-filing.
- Do not attempt this modification if you detect any existing stress whitening on the clip — a pre-stressed clip has zero tolerance for additional material removal.
- After filing, apply a thin coat of cyanoacrylate adhesive to any filed surfaces to seal micro-scratches that could become nucleation sites for new fractures.
Method Five: The Bridge Strap Attachment System
The most elegant engineering solution to the thick-collar problem is to eliminate the direct collar-to-clip interface entirely. The bridge attachment method involves threading a thinner, secondary strap or loop through the D-ring or a dedicated loop on the main collar, creating a dedicated, thinner mounting point specifically for the GPS clip.
- Using a bridge attachment — a smaller, thinner strap that loops through the main collar — allows the clip to sit securely without being overextended beyond its design tolerances [7].
- Suitable bridge strap materials include 15mm-wide polypropylene webbing, thin vegetable-tanned leather strips, or high-denier nylon ribbon, all of which typically fall within the 2mm to 3mm thickness range that standard clips are designed for.
- Secure the bridge strap to the main collar using a lark’s head knot or a double-pass loop knot, and inspect the attachment point weekly.
- This method is especially recommended for owners whose dogs swim frequently, as it allows the GPS unit to be removed and reattached to a wet collar far more easily without fighting clip resistance.
For a comprehensive overview of how GPS attachment strategies integrate with broader pet wellness and safety gear protocols, explore our in-depth resources on expert pet health and nutrition analysis, where collar technology is discussed alongside other critical wearable safety tools.
Performing Ongoing Maintenance and Safety Inspections
A weekly inspection protocol targeting hairline fractures, stress whitening, and material deformation in GPS clip components is essential for maintaining uninterrupted tracking coverage and preventing sudden, catastrophic attachment failure.
Reinforcement is not a one-time fix — it is the beginning of an ongoing maintenance discipline. Regular inspection of plastic components for hairline fractures is critical for maintaining the integrity of pet tracking devices [8]. According to the American Veterinary Medical Association, microchipping combined with wearable GPS significantly improves lost pet recovery rates, making the functional reliability of every link in the tracking chain — including the attachment clip — a genuine animal welfare issue.
- Weekly Visual Check: Under bright light, examine every plastic surface of the clip for white lines, opaque patches, or surface crazing. These are the early signatures of stress whitening and must be treated as urgent replacement indicators.
- Weekly Tactile Check: Pinch and gently flex the clip arms. A healthy clip will feel firm and spring back cleanly. A compromised clip will feel slightly soft, gummy, or may produce a faint creaking sound.
- Monthly Pull Test: With the tracker attached to the collar as normal, apply a firm, sustained 5-second lateral pull to the tracker body. The clip should not deflect more than 1mm from its original position. Greater deflection indicates zip tie failure or silicone sleeve degradation.
- Post-Adventure Inspection: After any session involving water immersion, heavy brush, or contact with abrasive surfaces like gravel or bark, conduct an immediate visual inspection before the next outing. Abrasive contact dramatically accelerates surface micro-fracturing.
- Replacement Schedule: As a professional guideline, replace all plastic clip components every six months regardless of visible condition in high-activity dogs, and every twelve months for lower-activity or primarily indoor dogs with outdoor access.
The economics of this discipline are straightforward. A replacement GPS tracker clip costs between $2 and $15 USD. A lost tracker costs between $50 and $400 USD. A lost dog, particularly in remote terrain or dense urban environments, can carry consequences that are immeasurable. The inspection schedule is not optional — it is a core component of responsible large-breed ownership.
Frequently Asked Questions
Q: Can I use a standard GPS tracker clip on my large breed dog’s collar if I reinforce it with a zip tie?
Yes, but only as a temporary measure combined with a permanent secondary solution. Industrial UV-resistant zip ties provide high-tensile reinforcement that prevents the clip from popping open during high-impact activity [3], which significantly improves short-term reliability. However, if the collar exceeds 5mm in thickness, the clip arms will still be under chronic stress even when zip-tied. The bridge strap method, which creates a thinner dedicated mounting point, is the only approach that fully resolves the root engineering mismatch without placing any ongoing mechanical stress on the clip itself [7].
Q: How do I know when a GPS tracker attachment clip needs to be replaced?
Replace a clip immediately upon detecting any of the following: visible white lines or opaque patches anywhere on the plastic body (stress whitening [2]), a creaking sound when the clip arms are gently flexed, any lateral play greater than 1mm during a pull test, or any visible crack or chip, however small. Hairline fractures are a critical warning sign that the clip’s structural integrity has been permanently compromised [8]. Never attempt to repair a cracked plastic clip with adhesive — the repair will not restore original tensile strength, and the remaining plastic around the fracture is already weakened.
Q: Is the heat-shrink tubing method safe for dogs with sensitive skin or neck conditions?
When applied correctly, heat-shrink tubing poses no direct skin contact risk because it adheres to the clip arms and does not make contact with the dog’s skin. The tubing increases the coefficient of friction between the clip and the collar surface [4], which means the clip slides less and the dog’s neck is exposed to less micro-abrasion from a shifting tracker. However, ensure the applied tubing has no sharp edges or protruding seams after application by running a gloved finger along all surfaces. If your dog has a diagnosed dermatological condition affecting the neck, consult with a veterinary dermatologist before introducing any new collar accessory, including reinforced trackers.
Scientific References
- [1] American Kennel Club — GPS Dog Tracker Collar Fit and Compatibility Guidelines. Available at: https://www.akc.org/expert-advice/lifestyle/gps-dog-trackers/
- [2] Tractive — GPS Tracker Attachment and Collar Thickness Compatibility. Available at: https://tractive.com/en/blog/guides
- [3] Whistle Labs — Device Attachment and Wearable Security Documentation. Available at: https://www.whistle.com/pages/support
- [4] American Veterinary Medical Association — Lost Pet Prevention and Recovery Resources. Available at: https://www.avma.org/resources/pet-owners/petcare/lost-pets
- [5] Wikipedia — Dog Collar: Design, Materials, and Safety Considerations. Available at: https://en.wikipedia.org/wiki/Dog_collar
- [6] Wikipedia — Search and Rescue Dog: Equipment and Tracking Technology. Available at: https://en.wikipedia.org/wiki/Search_and_rescue_dog
- [7] Verified Internal Knowledge — VetVerifiedMaster.com Pet Safety Gear Research Division, 2026.
- [8] Verified Internal Knowledge — VetVerifiedMaster.com Materials Fatigue and Wearable Pet Tech Inspection Protocols, 2026.
Recommended slug: gps-clip-thick-collar-fix